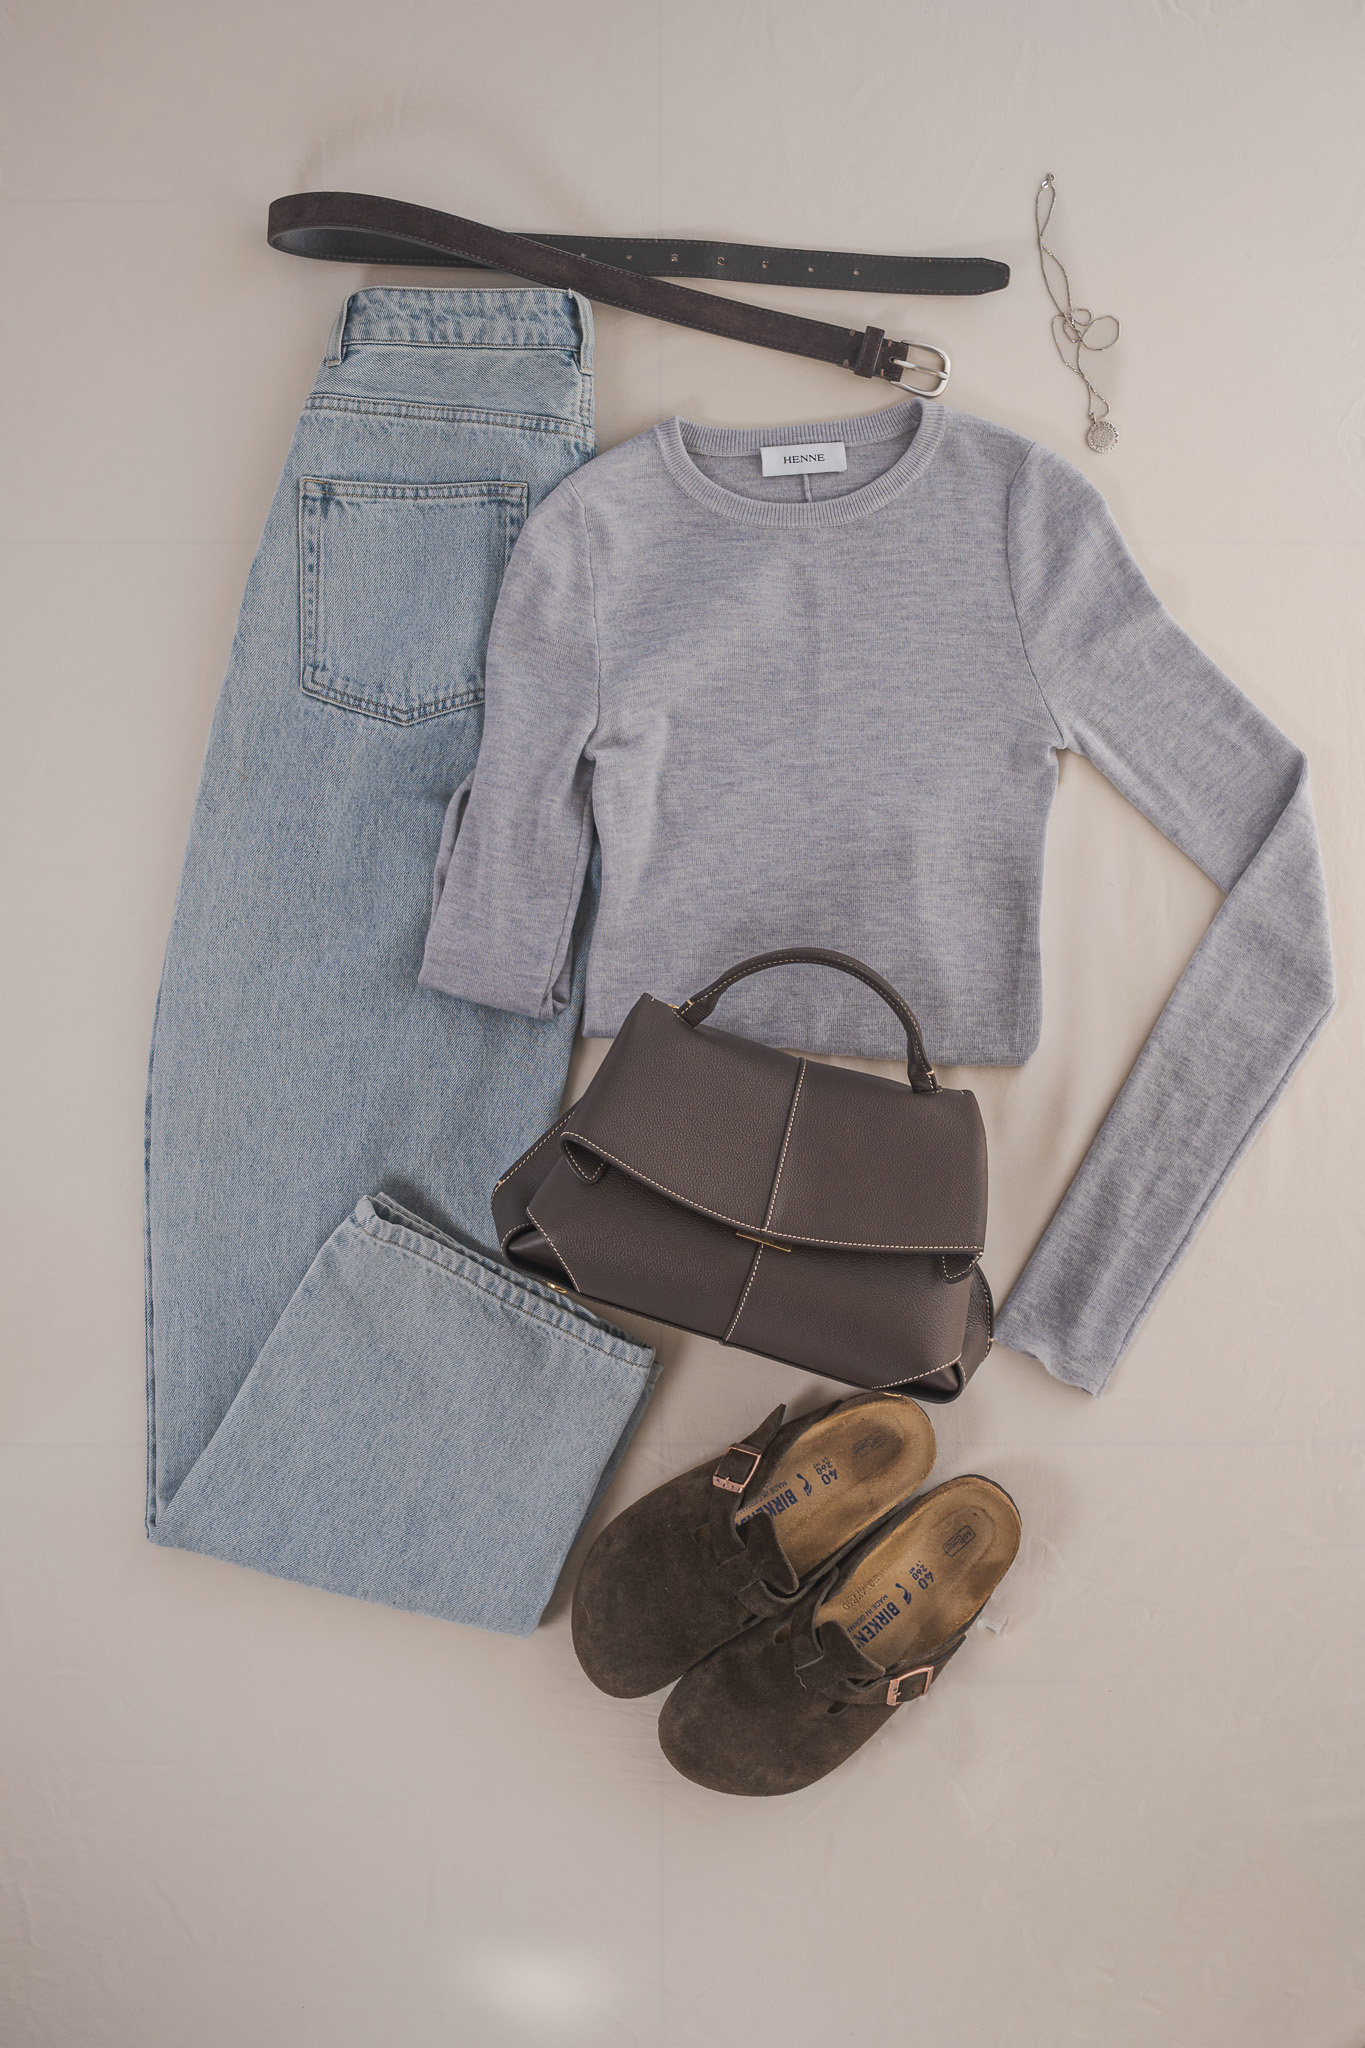
Clothing flat lays look simple, but getting them to look polished can take more work than expected. Fabric creases, awkward shapes, poor lighting and distracting backgrounds can all make an outfit look less appealing in a photograph than it does in real life.
I take most of my blog and Pinterest images at home, so I have had to learn how to make clothing flat lays work in a fairly normal space without a professional studio. The biggest improvement did not come from buying a better camera. It came from paying more attention to preparation, lighting, styling and the position of each item.
In this post, I am sharing the process I use to photograph clothing flat lays at home, including how I prepare the clothes, arrange an outfit, set up the lighting and edit the final image.

This post contains affiliate links. This means I may earn a small commission if you purchase through one of my links, at no additional cost to you.
Start With a Simple Background
A clean background immediately makes a clothing flat lay look more intentional.
I usually prefer a white or soft neutral background because it keeps the focus on the outfit and works well with the muted colours I tend to photograph. It also makes the finished image easier to use across my blog, Pinterest and social media.
You do not necessarily need a professional photography backdrop. Depending on the size of the outfit, you could use:
- A large sheet of white foam board or
- White or neutral backdrop paper
- A clean table
- A plain rug
- A large piece of neutral fabric
- A vinyl photography backdrop
Here, I am using a neutral beige sheet on the floor as the background, with a white tablecloth positioned at the side to help reflect more light onto the clothing.
I am using these spring clamps to hold the white table cloth up.

The main thing is to avoid a background with too much texture, pattern or visible clutter. A subtle texture can add interest, but it should not compete with the clothing.
Before taking any photos, I also clean the background and check for dust, hair or marks. These small details are much more noticeable once the image is viewed on a larger screen.
Products to link: foam board, backdrop paper, neutral vinyl backdrop or backdrop clips.
Prepare the Clothing Before Styling It
This is one of the most important parts of the process.
Even a beautiful piece of clothing can look untidy in a flat lay if it is creased, covered in lint or folded awkwardly. Cameras also tend to make wrinkles and loose threads look more obvious than they appear in person.
Before photographing anything, I usually:
- Steam or iron the clothing
- Remove visible lint and pet hair
- Check for loose threads
- Smooth out collars, cuffs and hems
- Make sure buttons and zips are sitting correctly
- Remove tags that should not be visible
A handheld garment steamer is especially useful because it is faster than setting up an ironing board and is gentler on some knitwear and delicate fabrics.

I also keep a lint roller nearby. This is essential when photographing dark clothing, wool coats or knitwear, especially in a house with a dog.
A fabric shaver can also help refresh knitwear that has started to pill, although I would only use it carefully and according to the garment’s care instructions.
I use both this upright garment steamer with a board, which can also double as a backdrop stand, and smaller portable steamer when I need a quicker option.
Choose One Main Outfit
Flat lays can quickly become cluttered when too many pieces are included.
For most outfit images, I start with one main clothing combination and then add a small number of accessories. This might include:
- A top
- Trousers, jeans or a skirt
- Shoes
- A bag
- One or two pieces of jewellery
The clothing should remain the focus. Accessories are there to complete the story rather than fill every empty space.
Before arranging the outfit, I usually decide what the image is meant to communicate. It could be a Soft Summer winter outfit, a casual weekend look, a work outfit or a capsule wardrobe combination.
Having a clear theme makes it easier to decide which items belong in the image and which ones should be left out.

Arrange the Largest Pieces First
I normally begin with the largest garment, such as a coat, pair of trousers or knit sweater. This gives the rest of the image an anchor.
There are several ways to position clothing in a flat lay.
You can lay each item completely flat, but this sometimes makes clothing look stiff or shapeless. I usually prefer to create a little softness and movement by gently folding sleeves, curving a trouser leg or allowing part of a knit to overlap another item.
The goal is to make the clothing look styled rather than dropped onto the floor.
For tops and knitwear, I pay attention to:
- The shape of the neckline
- The position of the sleeves
- Whether the waist needs to be defined
- Whether the shoulders look symmetrical
- How much of the fabric texture is visible
For trousers or jeans, I often fold or angle one leg slightly rather than laying both legs completely straight. This helps the image fit more naturally into a vertical format.
A small styling clip can be useful behind the garment to create a better shape. Fashion tape can also help keep lightweight fabric in place, although I would avoid using anything that could damage delicate material.
Create Shape Without Making It Look Too Perfect
Clothing can look surprisingly flat when photographed directly from above.
To create a more natural shape, I sometimes gather or fold the fabric slightly. For example:
- Tuck part of a sweater under itself to define the waist
- Roll or bend the sleeves gently
- Allow a coat lapel to sit slightly open
- Angle one trouser leg
- Let a shirt hem overlap another garment
- Place a small amount of tissue paper under an item to create subtle depth
The effect should be understated. Too much padding or folding can make the garment look unrealistic.

I normally step back and look at the whole arrangement before adjusting the smaller details. It is easy to spend too much time fixing one sleeve while missing the fact that the overall outfit looks unbalanced.
Leave Enough Space Around Each Item
One of the easiest ways to make a flat lay look more polished is to give the items room to breathe.
Try not to push every piece tightly together. A small amount of white space between garments and accessories helps each item remain visible and makes the image feel calmer.
At the same time, the pieces should still feel connected. If they are spaced too far apart, the flat lay can look like a collection of unrelated products rather than one complete outfit.
I usually allow some items to overlap slightly, then leave more generous space around the outside of the arrangement.
For Pinterest, it is also worth leaving some clear space near the top or bottom of the image in case you decide to add a headline later.
Use Accessories Carefully
Accessories can make a flat lay feel more complete, but they are also one of the easiest ways to overcrowd the image.
I prefer to use only a few accessories that clearly suit the outfit. For example, a Soft Summer outfit might include silver jewellery, a cool taupe bag and muted shoes.
Jewellery can be particularly effective because it adds detail without taking up too much space. However, very small pieces can disappear in a wide shot, so I usually place them where they contrast clearly with the background or clothing.
Shoes and handbags often work best near the edge of the composition, where they help frame the main garments.
I avoid adding unrelated props simply to fill empty spaces. A coffee cup, book or pair of sunglasses can work in the right image, but they should support the overall mood rather than distract from the clothing.
Use Soft, Even Lighting
Lighting has one of the biggest effects on the final image.
Natural window light can work well, especially when it is bright but indirect. Harsh sunlight can create strong shadows and uneven highlights, particularly on white, satin or textured fabrics.
Because natural light in my house is not always consistent, I also use continuous lighting for my flat lay photography. This allows me to photograph at different times of day and gives me more control over the result.
For clothing flat lays, I prefer soft light coming from the side rather than directly above the outfit. Side lighting reveals fabric texture and creates subtle depth without producing overly harsh shadows.
If the shadows are too strong, I use a white foam board, reflector or a white sheet on the side to bounce some light back into the scene.
A simple setup might include:
- One continuous light with a softbox or umbrella
- A white photography reflector or piece of foam board — I am using a piece of scrap foam packaging
- An overhead camera or phone mount
- A clean, neutral background

You do not need several lights to get started. One well-positioned soft light is often easier to control than multiple light sources.
Turn Off Other Lights in the Room
Mixing different light sources can cause colour problems.
For example, daylight from a window may be relatively cool, while an overhead household light may create a yellow or orange cast. When these light sources mix, it can be difficult to make the clothing colours look accurate.
I usually turn off the main room lights and use either window light or my photography light, rather than combining everything.
This is especially important when photographing Soft Summer colours, neutrals or subtle shades that can easily appear warmer or more saturated than they are in real life.
Photograph From Directly Above
A clothing flat lay should usually be photographed with the camera or phone positioned as close to directly above the arrangement as possible.
If the camera is angled, clothing can appear distorted and one side of the image may look larger than the other.
An overhead tripod or horizontal mounting arm or phone mount makes this much easier. It also keeps the camera stable and allows you to maintain the same framing while adjusting the outfit.
Before taking the photo, I check that:
- The camera is level
- The lens is centred over the arrangement
- No tripod legs are visible
- The entire outfit fits within the frame
- There is enough space to crop the image later
When possible, I photograph slightly wider than I think I need. This gives me more flexibility to create different crops for my blog, Pinterest and Instagram.
Camera or Phone Settings
You can create good clothing flat lays with either a camera or a phone.
The most important factors are stable positioning, sufficient light and accurate focus.
When using a camera, I generally want enough depth of field for the clothing and accessories to remain sharp. Because everything is positioned on a similar plane, an extremely narrow aperture is not usually necessary.
A tripod also allows you to use a lower ISO and slower shutter speed without introducing camera shake.
When using a phone:
- Clean the camera lens first
- Use the main rear camera rather than the front camera
- Avoid digital zoom
- Tap on the main garment to set focus
- Reduce the exposure slightly if white fabric looks too bright
- Use the timer or a remote shutter to prevent movement
I also avoid using portrait mode for flat lays because it can blur the edges of garments and accessories inconsistently.
Check the Colours Before Packing Everything Away
Clothing colours can shift considerably depending on the lighting, camera settings and editing.
Before I move the outfit, I check the images on a larger screen where possible. I look for:
- Fabric that appears too warm or cool
- White clothing that looks yellow or blue
- Dark garments that have lost detail
- Bright highlights on satin, leather or jewellery
- Shadows that are too heavy
- Areas that are out of focus
This is much easier to correct while the setup is still in place.
A grey card can also be useful for setting a more accurate white balance, particularly when photographing colours for seasonal colour analysis or product comparisons.
Take Detail Photos as Well
Once the main outfit image is finished, I usually take a few closer photographs.
Detail images can show:
- Knit texture
- Buttons
- Jewellery
- Leather or suede finishes
- Fabric drape
- Layering combinations
- Colour pairings

These close-up images are useful within a blog post and give you more content to use on Pinterest.
They also help readers understand why certain pieces work together, particularly in articles about colour, fabric quality or wardrobe styling.
Edit Without Changing the Clothing Too Much
My main goal when editing a clothing flat lay is to make the image look clean and accurate.
I normally adjust:
- Exposure
- White balance
- Contrast
- Highlights and shadows
- Straightening
- Cropping
- Minor dust or background marks
I try not to over-saturate the colours or apply a heavy preset. This can make clothing look very different from how it appears in real life.
For style and colour-analysis content, colour accuracy is especially important. A muted blue-grey knit should not end up looking bright blue, and a cool taupe should not become warm beige after editing.
I also use the editing stage to make sure the background looks consistent, but I avoid brightening it so much that the edges of pale clothing disappear.
Common Clothing Flat Lay Mistakes
These are some of the issues that can make a flat lay look less polished:
Photographing Creased Clothing
Wrinkles become very noticeable in overhead photographs. Steaming the clothes first usually makes a significant difference.
Using Harsh Overhead Lighting
Household ceiling lights can create unpleasant shadows and inaccurate colours. Soft window light or a diffused photography light tends to look much better.
Adding Too Many Accessories
More items do not necessarily make the image more interesting. A smaller number of well-chosen pieces usually looks more intentional.
Laying Everything Completely Straight
Perfectly straight sleeves and trouser legs can make an outfit look stiff. Small folds and gentle curves create a more editorial result.
Cropping Too Closely
Leaving extra room around the outfit gives you more flexibility when editing and creating vertical Pinterest pins.
Ignoring Lint and Pet Hair
Lint is particularly visible on dark fabric. Check the clothing closely before taking the final images.
Editing the Colours Too Heavily
Overediting may make the image more dramatic, but it can also make the clothes look inaccurate.
My Basic Clothing Flat Lay Toolkit
You do not need a large photography studio to create good clothing flat lays at home.
The tools I find most useful are:
- A garment steamer
- A lint roller
- A clean neutral background
- A continuous photography light
- A softbox or umbrella
- White foam board or a reflector
- An overhead tripod or phone mount
- Small styling clips
- A camera (I use my Nikon Zf for most of my blog images) or phone
- Basic editing software

You can start with the items you already own and gradually improve the setup as you work out what is actually useful for your space.
For a closer look at the equipment I use, you can also read my full guide to my flat lay photography setup at home.
Final Thoughts
The biggest lesson I have learned from photographing clothing at home is that styling and preparation matter just as much as the camera. I spend time setting up the background and equipment and preparing the clothing before arranging the outfit. This makes the photography process as seamless as possible.
A simple outfit can look polished when the clothes are steamed, the lighting is soft and the composition has enough space. At the same time, even expensive clothing can look untidy when it is creased, poorly lit or surrounded by too many accessories.
You do not need to create a perfectly symmetrical product photograph. Small folds, texture and movement can make a clothing flat lay feel more natural and editorial.
Start with a clean background, prepare each garment properly and keep the first setup simple. Once you have photographed a few outfits, it becomes much easier to recognise which arrangements, angles and lighting positions work best in your space.